Monday, May 9, 2016

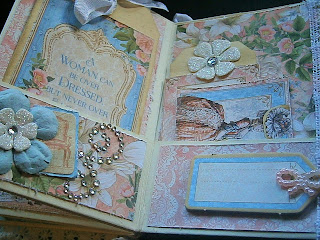
Gilded Lily Pocket Page Mini Album

Hey crafters.
Today I have this cute little pocket page mini album I created using supplies from Faith Pocock Studio Ltd.

The cool thing about this mini album is that the base of it is constructed with just 1 piece of 12 x 12 cardstock.  I have a video link below for you to see how it all comes together.

Once made you just go ahead and cover and mat the pages with your favorite design paper. I have use Graphic 45 Gilded Lily Papers aswelll as some chipboard elements from the collection and embellishments from Faiths store.


When you construct the base of the book you end up with a front and back cover and the pages in the middle all have pockets.  The book measures 8cm x 11cm.


I covered the base using the designer papers.  I used the journaling spaces on the cut apart pages to tuck into the pockets and fancy up some tea dyed tags.
Embellishing is so easy when you have Prima flowers to work with and gorgeous resin embellishments from faith shop.

I also used some stickers from the collection and some of the chip board embellishments.


Here is a video tutorial on how to create the base of the book.

I hope you give this a try.

Tasha

Altered Clock


Hey crafters
You know sometimes when you know you want to make something but you don"t really know what to make??  Well thats how I was feeling so I decided to gather together a whole bunch of crafty supplies from Faith Pocock Craft Studio Ltd and a clock that I got at the thrift shop and just got to it.


I decided to take the clock apart but when I was looking at the dismantled clock on my table I got a bit worried I had done something terribly wrong lol.


I managed to get the clock back together without the insides (whew) and then I used my alcohol ink to color the clock. I then used some sand paper to bring back some of the color underneath.  I thought it needed something else so with my fingertip I rubbed some silver paint over parts and it really looked great on the raised parts.


Below you can see that I lay some pattern paper down and went about adhering some cogs from Faiths store.  I used alcohol ink on some of them and the glue I used was E6000.  The wood icon I used was from the Epiphany collection. I used a Prima flower I colored with alcohol ink and silver paint and a couple of resin roses and a wee bottle with some tiny pearls in it.


After fitting the back onto the clock and gluing the and the plastic front I could then embellish the front.


Using E6000 again I adhered some silver chain around the rim and a couple of clogs.  I linked some chain from the top of the clock to a key that I i stuck onto the cogs.


I hope this has inspired you to gather all your crafty bits together and get your craft on.
Click HERE to go directly to Faiths online store and grab what you need to create something wonderful.

Tasha


Mixed Media Book Box

Hey there crafters
Faith from Faith Pocock Craft Studio sent me some awesome craft supplies so I got busy.  This awesome book box was so much fun.

After painting gesso over the entire box I then collaged some sewing pattern paper and then I did a light white wash after it was completely dry.

You can see below the fun I had adding all the gorgeous embellishments and fun  elements to the bos before I start to add colour with sprays.


I then added gesso in some area and added colour with my Lindys Sprays. The photos for this book box is really not showing off the beautiful colours....there is actually a lot of blues and teals.


I've altered another one of these book boxes and the next one is covered with paper wth lots of goodes inside.  I cant wait to show you that project soon.
Thanks for checking out my crafts.
Tasha xxx


Tuesday, September 8, 2015

DREAM - Wall Hanging


Hey Crafters

It's Tasha here and this week I have created a wee inspiration wall hanging using heaps of metal embellishments and other craft supplies from Faiths online store.


The first thing I did was prepare my surface.  This is some chipboard I have die cut. I actually adhered two layers on top of one another just to make it sturdier and thicker.  I then inked it with Vintage Photo distress stain.


I attached some antique bronze corners to some design paper that I had inked and used my distress tool around the edges and adhered it to the board.


The great thing about the metal filigree pieces is they are so easy to bend to shape and also to cut.  You can see here I have cut this piece so I can use the two pieces in different places.


After arranging some of the metal pieces I wanted to use I then went about gluing the pieces down using E6000.  This adhesive is the best for adhering metals.


I love this image on this cabochon and the bezel also comes in antique silver.  A metal rose and some cute charms are then laid down.  Those metal leaves are in the sizes small and medium.


The little wood veneer with the word dream on it came from
the Prima collection - Epiphany and so did those gorgeous sparkly gems.  A couple of resin rose cabochons and it's done.


I hope that has inspired you to use more metal in you projects.  So much you can do with all these great supplies.  I think metal embellishments look great layered up and are such fun to work with.

Until next time...
Happy Crafting
Tasha xx


Saturday, August 22, 2015

Easel Card - G45 Gilded Lily

Hey there crafters
Today I wanted to share with you an easel card using supplies from Faith Pocock Craft Studio.  
I have used papers from Graphic 45 - Gilded Lily


 You can see I have done some fussy cutting around the images and popped them up to give some dimension to the card.  Graphic 45 makes creating so easy with the sticker sheet and also the chipboard pieces to embellish with.

I have also embellished this card with a resin pieces from Faiths shop and some Prima flowers.
Here are some side views so you can see how the easel card looks when propped up.


On the inside of the card you can see I have used some pearl trim to act as a stopper when you have the card propped up.  Along with some more of the designer papers and chipboard die cuts.


Here's how to make the card.

First cut some card stock measuring 24cm x 12cm score and fold in the middle to create your CARD BASE.  Also cut a piece of cardstock 12cm x 12cm for your CARD FACE. 


Next step is to score and fold a line 6 cm up from the bottom.


Lastly you adhere the bottom half of you CARD FACE  to the bottom half of your CARD BASE.
When making these cards I like to decorate the CARD FACE first before I attach it to the CARD BASE.


I hope you give this card a try and pop by Faith Pocock Craft Studio to get all the supplies you need.

Happy crafting.

Monday, July 27, 2015

Butterfly Statement Necklace

Hey there crafters
It's Tasha here ansd I want to share with you this beautiful butterfly necklace I created using suplies from Faith Pocock Craft Studio.

I am new to Jewellery making but as you can see even beginners can create something beautiful when you have amazing supplies.


The pearls are from my stash but the beatiful butterfly as well as all the chain, charms and beadcaps you can find in faiths online store.

I used to be a bit intimidated by jewellery making.  The pieces I had in my head i didn't think were pieces that people would want to wear but then I came across this amazing artist Angela Venable and she shows us that whatever you want to do....JUST DO IT!!!  NOw my attitude to jewellery making has changed completely.  If you want to dangle keys here and skulls there GO FOR IT!!!

She also open my world up to E600.  Which I haven't used in this particuler piece but basically with E600 if you can't attatch it.....GLUE IT!! 

With all these great crafting supplies from faiths online store anything you want to create can be achieved!!

Hope you have been inspired to try your hand at making some wearable art.  For those who are already a bit fancy at making Jewellery be sure to check out the goodies over in Faiths store.

Don't forget you can use all these supplies in your papercrafting aswell and mixed media creations.
Have fun!!!

Tasha xx

Monday, June 29, 2015

Steampunk Inspired Statement Necklace


Hey there crafters
Today I have this Steampunk Inspired Statement Necklace.
I'm new to making jewellery but have been inspired by an amazing artist Angela Venable and now I have a new crafty addiction.


All the supplies you see here I have gotten from Faith Pocock Craft Studio Ltd.
Be sure to go to her shop and check out all the awesome charms, chain, cogs and filigree pieces I have used to create this piece.


Thank you for stopping by I have heaps more Jewellery Pieces to share with you and hope this has inspired you to have a go and have fun.

Tasha xx

Here are just a few of the supplies I used
Antique Bronze link Chain

Cable Chain - Bronze
Tiny Charms

Steampunk Gears